Homemade Bathroom Cleaner: Easy DIY for a Fresh Space
When it comes to home maintenance, a clean bathroom is essential—not just for aesthetics, but for your health and well-being too. Did you know that bathrooms can be crumbly little breeding grounds for harmful bacteria and allergens if they're not cleaned regularly? That's why keeping this space spotless is so important for the safety of your family. In this guide, we’ll dive deep into how you can create the best all-in-one homemade bathroom cleaner right in your kitchen, plus some extra tips to keep your bathroom fresh, inviting, and, most importantly, safe.
Why Choose Homemade Cleaners?
You might be wondering why you should consider making your own cleaners when there are countless commercial options available. Well, homemade cleaners come with a plethora of advantages. First off, they’re friendly to your wallet! Creating your own solutions can save you considerable money in the long run. Plus, you have complete control over what goes into them, ensuring that you’re using safe ingredients for both your family and the environment.
By opting for homemade cleaners, you’re dodging harsh chemicals that can irritate sensitive skin and pose harm to your pets. You’ll also be doing your part in reducing chemical waste in our planet’s water supply. With just a few basic ingredients, you can craft a bathroom cleaner that’s both effective and eco-conscious.
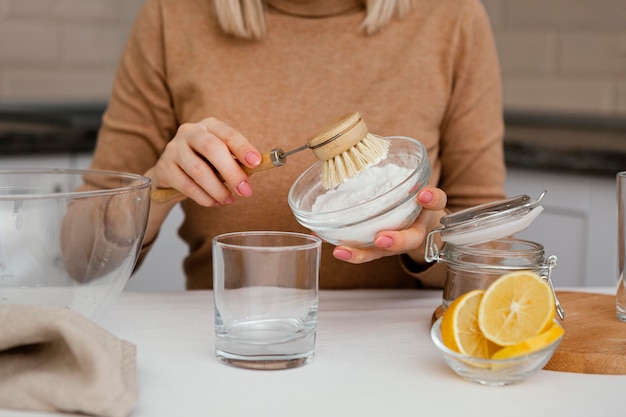
In this article, we’ll spotlight four primary ingredients that elevate your cleaning routine: white vinegar, baking soda, Castile soap, and essential oils.

Key Ingredients for an Effective Bathroom Cleaner
1. White Vinegar
Let’s kick things off with white vinegar—this versatile kitchen staple is a powerhouse when it comes to cleaning! Known for its natural antimicrobial properties, white vinegar shines in combatting hard water stains on faucets and showerheads. Whether you’re tackling stubborn soap scum or pesky mold and mildew, white vinegar has got your back in the bathroom.
2. Baking Soda
Next up is baking soda, a gentle yet fierce cleaning champion. Its mild abrasive nature allows you to scrub surfaces without scratching them. Not only does it dissolve dirt and grime, but it also neutralizes odors along the way. Pairing baking soda with other ingredients can turbocharge your cleaning efforts.
3. Castile Soap
Fancy a plant-based and biodegradable soap? Meet Castile soap! It’s not just safe for the environment; it’s also excellent for breaking down grease and removing dirt. With its non-toxic qualities, Castile soap provides a deep clean without the chemical-behind-the-sink harshness you might find with conventional soaps.
4. Essential Oils
And who doesn’t love a lovely scent? By adding essential oils—like tea tree or lavender—to your homemade cleaner, you not only enjoy a pleasant aroma but also boost its antibacterial properties. Tea tree oil, in particular, is renowned for its ability to fight bacteria and fungi, making it a fantastic choice for your bathroom cleaning arsenal.
5. Hydrogen Peroxide
Last but definitely not least, hydrogen peroxide acts as a formidable disinfectant that eliminates germs, viruses, and bacteria. It’s particularly useful for high-touch surfaces like doorknobs and light switches, ensuring these areas remain pristine.
Easy DIY Recipe for All-In-One Bathroom Cleaner
Now that we’ve covered the key ingredients, let’s get down to the exciting part: making your own all-in-one bathroom cleaner! It’s straightforward and incredibly satisfying. Here’s a super simple recipe to get you started:
Ingredients:
- 1 cup of white vinegar
- 1 cup of baking soda
- 1 tablespoon of Castile soap
- 10-15 drops of essential oil (like tea tree or lavender)
- 2 cups of water
Instructions:
- Combine Ingredients: Grab a spray bottle and combine all of the ingredients, starting with the white vinegar. Add the baking soda last, as it will fizz when it interacts with the vinegar.
- Mix Gently: Once everything is in the bottle, give it a gentle shake to mix the ingredients. Just be cautious—the vinegar and baking soda will create some carbon dioxide, so allow it to settle before you shake too vigorously.
- Application: Now it’s showtime! Spray generously on surfaces that need a little TLC. Allow the solution to sit for about 10 minutes, letting it break down stubborn grime before wiping clean with a soft cloth.
How to Use Your Homemade Cleaner
So, you’ve mixed up your magical potion—now what? Here’s how to put your homemade cleaner to work:
For Toilets:
Give the inside of the toilet bowl a spritz and let it sit for 10-15 minutes. After that, scrub with a toilet brush and flush for a fresh, clean finish.
For Sinks and Bathtubs:
Spray the surfaces, concentrating on those trouble spots with soap scum or dirt build-up. Let it soak for a few minutes, then wipe it down with a clean cloth or sponge to reveal a sparkling surface.
For Mirrors:
Grab a microfiber cloth or some paper towels and apply your homemade cleaner to those mirrors for streak-free results!

The Benefits of Switching to a Homemade Cleaner
Environmentally Friendly
Making the switch to homemade cleaning solutions significantly reduces your contribution to chemical waste and pollution. Unlike many commercial cleaners that contain harmful substances capable of leaching into our water supplies, your homemade alternatives use natural ingredients, making a positive impact on the planet.
Safer for Your Family
When you craft your cleaning supplies at home, you ensure that they’re free from toxic substances. This makes homemade cleaners a safer option—especially for households with young children and furry friends wandering around.
Cost-Effective
Purchasing commercial cleaning products can be a drain on your budget—especially if you clean frequently! Homemade cleaners, on the other hand, are inexpensive and easy to whip up, saving you money in the long haul.
Where to Buy Supplies
Finding the ingredients for your homemade bathroom cleaner couldn’t be easier! Most of the supplies you’ll need can be picked up at your local grocery store, eco-friendly shops, or even online. No need to embark on a lengthy shopping expedition—just a quick jaunt to your local supermarket will do the trick!
Going Beyond: Additional Cleaning Tips
Once you’ve concocted your homemade all-in-one cleaner, it might be helpful to implement some additional tips for a truly successful cleaning routine:
- Create a Cleaning Schedule: Consider setting up a regular routine (like weekly or bi-weekly) to ensure every nook and cranny of your bathroom gets the attention it deserves.
- Use Microfiber Cloths: These cloths not only remove dirt but also trap dust and allergens effectively, giving your space that thorough clean.
- Regular Maintenance: Engage in small daily tasks—like quickly wiping down surfaces or giving them a light spritz with your homemade cleaner—to create a significant difference over time.
- Best Spring Cleaning Checklist for Homeowners: Don’t forget to add bathroom cleaning to your annual spring cleaning routine. It’s the perfect opportunity to declutter and refresh this essential space!
Internal Links to Explore
For further tips on keeping your home spotless, check out our guides on The Importance of Regular House Cleaning for a Healthy Home and Easy Eco-Friendly Cleaning Tips for Every Room.
Final Thoughts
Maintaining a clean bathroom doesn’t have to feel overwhelming. With the right homemade cleaner—and the option for professional assistance—your bathroom can be a sanctuary of hygiene, relaxation, and rejuvenation. Unleash the potential of your space with these tips tailored just for you! Let TaskOpus tackle the dirt while you kick back and enjoy your fresh, tidy space. Explore our services and regain your peace of mind, knowing that your home is in expert hands.